> For the complete documentation index, see [llms.txt](https://docs.antbuddy.com/llms.txt). Markdown versions of documentation pages are available by appending `.md` to page URLs; this page is available as [Markdown](https://docs.antbuddy.com/tai-lieu-antbuddy-huong-dan-su-dung-antbuddy-docs-user-guide/quan-tri-khach-hang-antcrm-antcrm-customer-management/tin-nhan-da-kenh-conversation/shared-mailbox.md).
# Shared mailbox
## I.Tích hợp mail vào Shared Mailbox
**(Integrate email into Shared Mailbox)**
**Bước 1:** Vào thiết lập ⇒ Hội thoại đa kênh ⇒ Tích hợp Shared Mailbox\
(**Step 1**: Enter Setting ⇒ Omni Conversations ⇒ Shared Mailbox settings)
**Bước 2:** Bấm Thêm Trang và Chọn loại kết nối email mong muốn.\
(**Step 2**: Click Add page and Choose the desired email connection type.)
Ở đây chúng ta có 2 lựa chọn là tích hợp trực tiếp email Office 365 hoặc thông qua thiết lập IMAP/SMTP dành cho các loại email khác\
(Here we have two options: direct integration with Office 365 email or through IMAP/SMTP setup for other types of email.)
**Bước 3A:** Đăng nhập vào tài khoản email Office 365\
(**Step 3A:** Sign in to an Office 365 email account)
hoặc (or)
**Bước 3B:** Đăng nhập qua giao thức IMAP/SMTP\
(**Step 3B**: Login via IMAP/SMTP protocol)
Lưu ý: Nếu bạn sử dụng tính năng bảo mật 2 lớp, thì mật khẩu đăng nhập phải là mật khẩu ứng dụng của email. \
(Note: If you use 2-layer security, the login password must be the email application password.)
[Hướng dẫn tạo mật khẩu ứng dụng Gmail](https://support.google.com/accounts/answer/185833?hl=vi)
[Hướng dẫn tạo mật khẩu ứng dụng Office 365](https://support.microsoft.com/vi-vn/account-billing/c%C3%A1ch-s%E1%BB%AD-d%E1%BB%A5ng-m%E1%BA%ADt-kh%E1%BA%A9u-%E1%BB%A9ng-d%E1%BB%A5ng-v%E1%BB%9Bi-c%C3%A1c-%E1%BB%A9ng-d%E1%BB%A5ng-kh%C3%B4ng-h%E1%BB%97-tr%E1%BB%A3-x%C3%A1c-minh-hai-b%C6%B0%E1%BB%9Bc-5896ed9b-4263-e681-128a-a6f2979a7944)
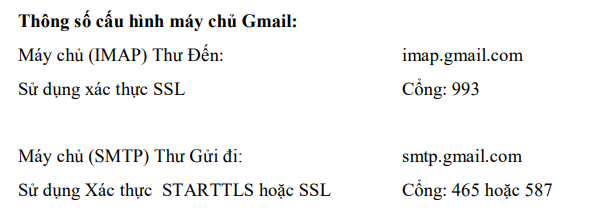
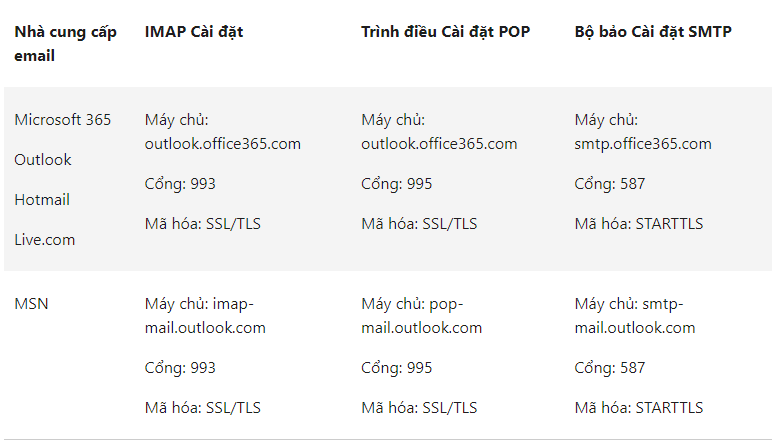
Thông số cấu hình imap/smtp\
(Imap/smtp configuration parameters)
Gmail:
Microsoft 365, Outlook, Hotmail, Live.com, MSN:
Bước 4: Chọn Đăng ký\
(Step 4: Choose Activate)
Giao diện khi đăng ký thành công\
(Message after successful registration)
Bước 5: Chọn Cài đặt và thiết lập nhóm User hỗ trợ và cấu hình phân công tương tự như Omni Chat\
(Step 5: Choose Settings and Settings for User support group and assignment configuration is similar to Omni Chat)
#### II. Giao diện sử dụng:
(II. Using interface:)
Menu Quản lý hội thoại ⇒ Hộp thư chung\
(Go to Omniconversations ⇒ shared mailbox)
Tại giao diện này, người dùng có thể:\
(This interface, users can:)
* Nhận mail, trả lời email của khách hàng.\
(Receive mail, reply to email of customer.)
* Tìm kiếm email theo bộ lọc
(Search emails by filter)
* Phân công phụ trách session, đánh dấu đã xử lí xong.\
(Assign the session to be in charge and mark it as completed.)
* Tương tác với khách hàng qua các kênh khác như gọi điện- gửi tin nhắn….\
(Interact with customers through other channels such as phone calls, text messages, ....)
* Lên phiếu sự vụ, đơn hàng, nhiệm vụ…\
(Create tickets, orders, and tasks)
#### III. Kích hoạt Kênh hỗ trợ Email cho Ticket:
**(Activate Email Support Channel for Tickets)**
Vào Thiết lập ⇒ Phiếu yêu cầu ⇒ Kênh hỗ trợ\
(Go to settings ⇒ Tickets ⇒ Support chanels)
Email đã liên kết thành công ở mục Shared Mailbox sẽ nằm ở danh sách địa chỉ email hỗ trợ\
(The email successfully linked in the Shared Mailbox section will appear in the list of support email addresses.)
Bấm Enable để bắt đầu cấu hình ticket tự động\
(Click Enable to start configuring automatic ticketing)
Bấm Sửa đổi để cài đặt thông tin cho ticket được tạo tự động từ Shared mailbox:\
(Click Edit to set up information for tickets automatically created from the Shared Mailbox:)
* **Phân cho nhóm:** Ticket mới được tạo từ email này sẽ được phân công tự động cho nhóm được chon\
(**Assign to Group:** New tickets created from this email will be automatically assigned to the selected group.)
* **Tag mặc định**: Gắn nhãn tự động cho ticket\
(**Default Tag**: Automatically add a tag to the ticket)
Nhấn Save để hoàn tất cấu hình\
(Click Save to complete the configuration.)
Khi có email vào email hỗ trợ thì hệ thống sẽ đồng thời tạo ticket mới theo thông tin đã cấu hình, ví dụ\
(When an email is sent to the support email address, the system will automatically create a new ticket based on the configured settings. For example)
---
# Agent Instructions
This documentation is published with GitBook. GitBook is the documentation platform designed so that both humans and AI agents can read, navigate, and reason over technical content effectively. Learn more at gitbook.com.
## Querying This Documentation
If you need additional information that is not directly available in this page, you can query the documentation dynamically by asking a question.
Perform an HTTP GET request on the current page URL with the `ask` query parameter:
```
GET https://docs.antbuddy.com/tai-lieu-antbuddy-huong-dan-su-dung-antbuddy-docs-user-guide/quan-tri-khach-hang-antcrm-antcrm-customer-management/tin-nhan-da-kenh-conversation/shared-mailbox.md?ask=
```
The question should be specific, self-contained, and written in natural language.
The response will contain a direct answer to the question and relevant excerpts and sources from the documentation.
Use this mechanism when the answer is not explicitly present in the current page, you need clarification or additional context, or you want to retrieve related documentation sections.