> For the complete documentation index, see [llms.txt](https://docs.antbuddy.com/llms.txt). Markdown versions of documentation pages are available by appending `.md` to page URLs; this page is available as [Markdown](https://docs.antbuddy.com/tai-lieu-antbuddy-huong-dan-su-dung-antbuddy-docs-user-guide/tong-dai-antring-antring-call-center/cai-dat-setting/dien-thoai-grandstream-gxp-1610.md).
# Điện thoại Grandstream GXP 1610
AntRing Configure IP Phone Grandstream GXP 1610
### 1. Set up thiết bị
### (Set up device)
Bước 1: Cắm nguồn
(Step 1: Plug in the power source)
Bước 2: Cắm dây mạng (cổng LAN)
(Step 2: Plug in the network cable (LAN port)
Bước 3: Cắm handset, headset (Lưu ý cắm đúng cổng).
(Step 3: Plug in the handset and headset (Be sure to plug in the correct port).

Bước 4: Lấy địa chỉ IP
(Step 4: Get IP address)
Mặc định thiết bị sẽ dùng DHCP để lấy IP. Để xem được IP của thiết bị:
(By default, the device will use DHCP to get the IP. To view the IP of the device:)
* Đợi thiết bị khởi động hoàn tất.
(Wait for the device to boot up completely.)
* Nhấn phím **NextScr** 2 lần
(Press **NextScr** key 2 times)

### 2. Truy cập WebAdmin
### (Access WebAdmin)
Sau khi có được IP của thiết bị, chúng ta có thể đăng nhập vào trang quản lý bằng cách: vào địa chỉ IP trên trình duyệt (ví dụ: ở đây là ).
(After getting the device's IP, we can log in to the management page by: entering the IP address on the browser (for example, here is ).
Đăng nhập vào user mặc định: admin/admin
(Login to the default user: admin/admin)

Sau đó nhận được yêu cầu thay đổi password
(Then receive a request to change the password)
Ví dụ : thay đổi thành admin1610 => nhấn Save
(For example: change to admin1610 => click Save.)
Sau khi đăng nhập thành công, bạn sẽ được chuyển vào trang cấu hình sau:
(After successfully logging in, you will be redirected to the following configuration page:)

3\. Cấu hình SIP account
(Configure SIP account)
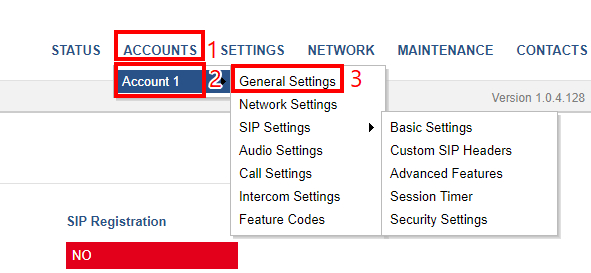
Để điền thông tin account ta click chọn **ACCOUNTS -> Account 1 -> General Settings**
(To fill in account information, click om **ACCOUNTS -> Account 1 -> General Settings)**
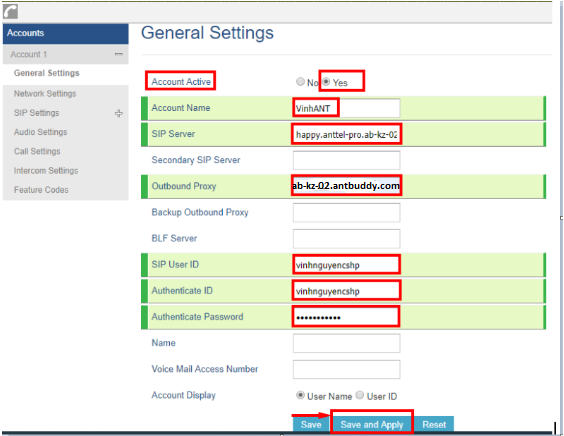
Điền thông tin của SIP account được cấp tương ứng như sau:
(Fill in the corresponding SIP account information as follows:)
**General Settings**
Basic Settings : Chọn giao thức SIP transport là TCP, Register Expiration giảm từ 60 về 5
(Basic Settings : Choose the SIP transport protocol as TCP, Register Expiration decreases from 60 to 5)

Audio Settings : chọn PCMA or PCMU
(Audio Settings : choose PCMA or PCMU)

Date and Time:

Kiểm tra
(Check)
Chọn STATUS xem mục "SIP Registration" hiện "YES" màu xanh như hình
(Choose **STATUS** view ***"SIP Registration"*** section appear ***"YES"*** green color like the image:)

Giao diện Ip Phone:
(Ip Phone interface:)